
Process and Android Lifecycle
Discover Android process management, component life cycles, and app strategies for optimal performance and memory handling. Ideal for developers

Software Developer
Introduction
Understanding how Android manages processes, components, and the overall lifecycle of an application is fundamental for any developer creating apps. This article delves into the core concepts behind process creation, control, and sandboxing within the Android system. It also explores the lifecycles of key components like Activities, Services, and BroadcastReceivers, providing a roadmap for effective component management.
Processes in Android
Process Creation:
When an Android application is launched, the system creates a new Linux process for it. This process serves as the execution environment for the application's code.
Every Android application runs in its own Linux process.
When an app's code needs to run (e.g., launching an activity), the system creates a process for that app.
The process remains running until the system reclaims its memory for other applications.
Process Lifetime Control:
Unlike traditional systems, an app's process lifetime isn't directly controlled by the app itself.
The system determines when to start, pause, or terminate a process based on various factors:
Active components (e.g., Activity, Service, BroadcastReceiver)
Importance to the user
Overall system memory availability
Created when the application is launched
Destroyed when the application is terminated
Common Pitfall:
- Incorrectly managing components, such as starting threads from a
BroadcastReceiver, can cause process termination.BroadcastReceivershave a very short lifecycle. They are meant to handle events quickly and then end. If you start a long-running operation, like a thread, within aBroadcastReceiver, the system might terminate the process before the thread finishes. This happens because theBroadcastReceiveris no longer active, and if the system is low on memory, it may reclaim resources by ending the process. To manage long-running tasks, it's better to use aServiceor other components designed for such operations.
- Incorrectly managing components, such as starting threads from a
Sandboxing in Android Processes
Android enforces strong process isolation through sandboxing.
Each app runs in its own sandboxed process, isolated from other apps.
Linux user-based security ensures file permissions and access control.
Inter-process communication (IPC) mechanisms allow controlled data exchange.
Viewing Android Processes with adb shell ps
ADB (Android Debug Bridge) is a versatile command-line tool that allows you to interact with an Android device or emulator. One of its essential features is the ability to view running processes. By executing the command adb shell ps -A -o pid,name, we can view all the processes currently running on the emulator, including their Process IDs (PIDs) and names.
Prerequisites
Before we begin, ensure that you have the following:
A computer with ADB installed.
An Android device connected to your computer via USB or emulator.
USB debugging enabled on your Android device (you can enable it in the Developer Options) or wireless debugging.
Steps to View Processes
Follow these steps to view the processes:
Open a terminal or command prompt on your computer.
Connect your Android device to your computer via USB.
Execute the following command:
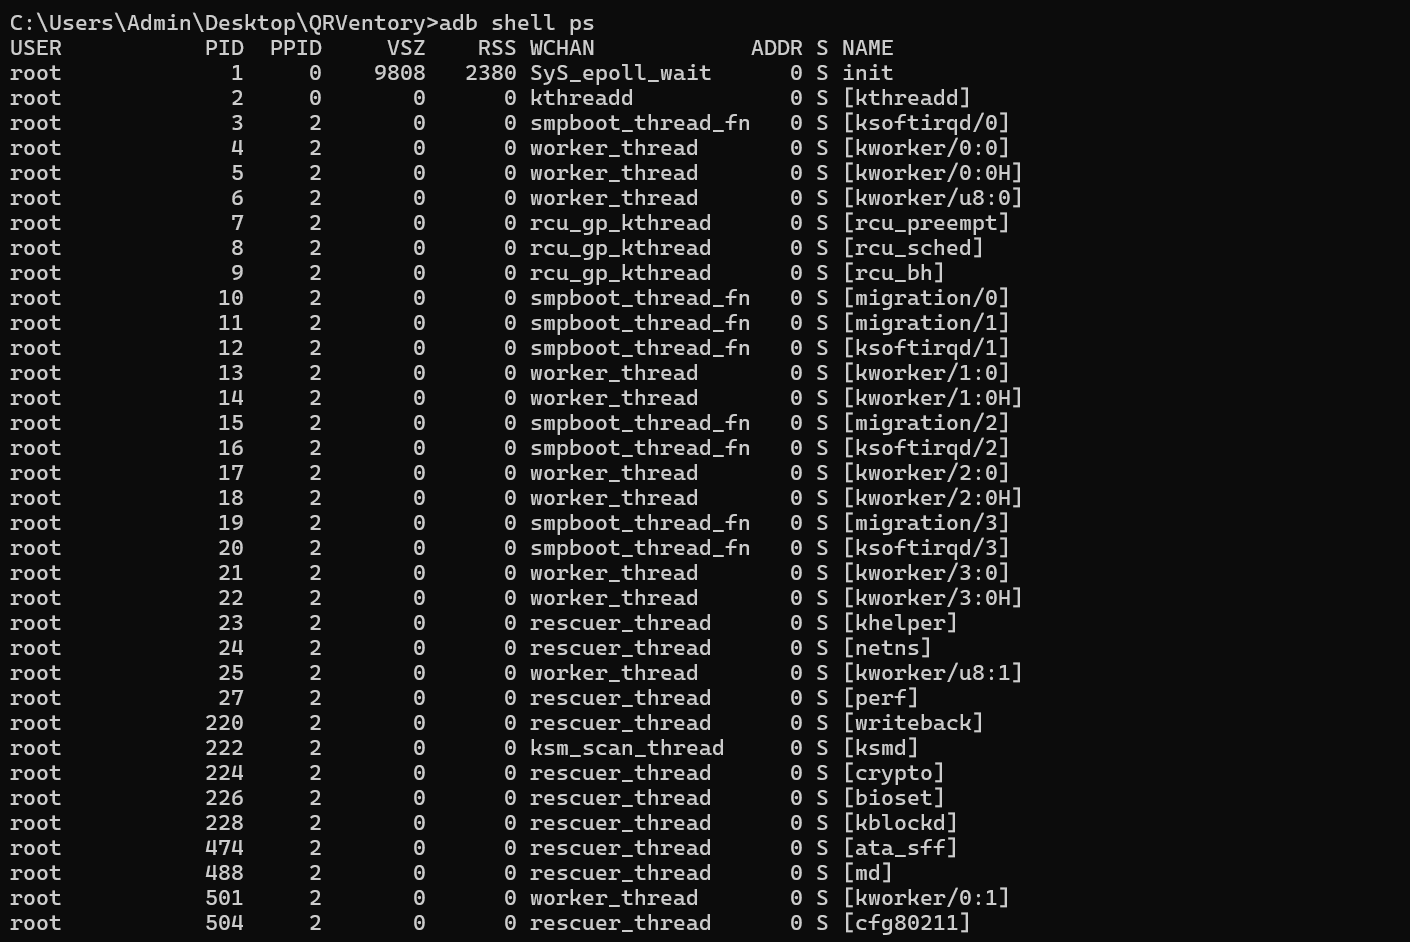
adb shell ps
Even without launching any applications, you'll notice numerous system processes running on the device. These processes are created by the Android system itself. For example, processes like "logcat" handle logging functionality, while "storage" and "wifi" are likely related to storage and Wi-Fi services, respectively.
Launching the Application
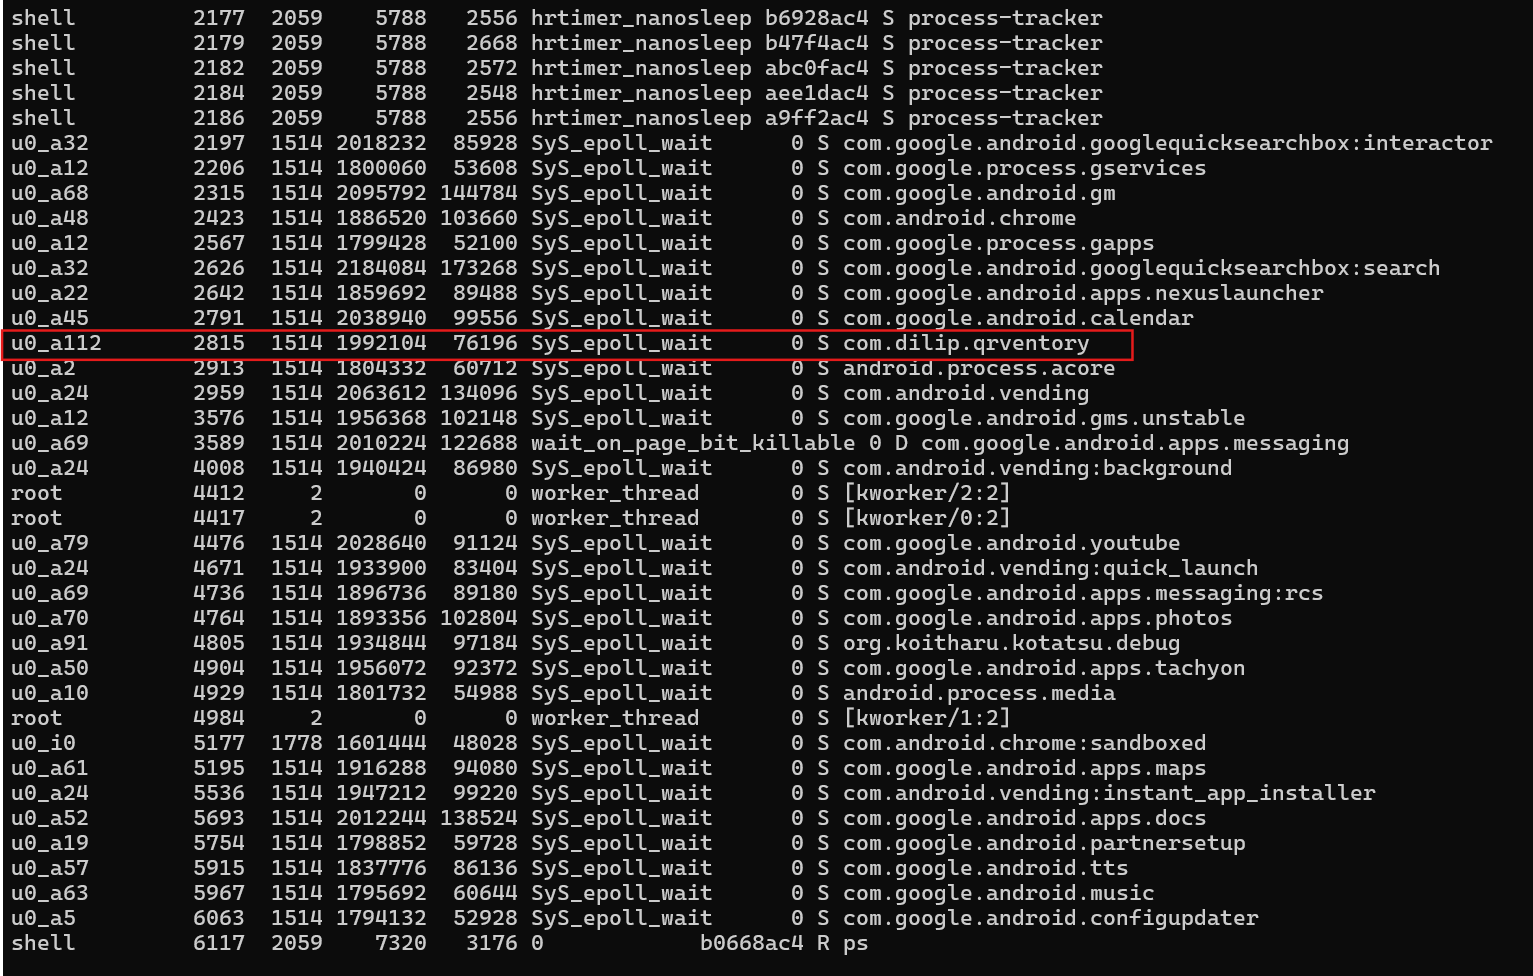
Now, let's launch the "QRVentory" application from Android Studio. After launching the app, executing the ADB command again reveals a new process with a specific PID and the application ID as its name. This indicates that launching the application creates a new Linux process for it.
C:\Users\Admin\Desktop\QRVentory>adb shell ps
adb shelll ps will display a list of all processes, including their PIDs, UIDs, and other relevant details.
Understanding the Output
The output will include information such as:
PID (Process ID): A unique identifier for each running process.
UID (User ID): The user associated with the process.
Name: The name of the process (e.g., app package name).
Status: Whether the process is running, sleeping, or stopped.
Memory usage: Details about memory consumption.
Backgrounding and Killing Processes
When you send an Android application to the background by pressing the home button, the process remains active. This means the application is not terminated; it simply waits in the background, ready to be brought back to the foreground when needed. To kill the process, you can swipe the application away from the recent apps screen. This action effectively terminates the process.
This command lists all running processes:
adb shell ps -A -o pid,name
To kill an app from the terminal, you can use the following ADB command:
adb shell kill <PID>
This command requires the process ID and will terminate the entire process. When you reopen the app, it will start from the launcher screen, not from where you left off.
For instance, if you press the home button and leave the app on a specific screen with certain memory variables, and the Android OS decides to reclaim resources, it may kill your app. When the user returns to the app via the recent apps option, the OS will recreate the last opened activity. If you haven't implemented onSaveInstanceState() and onRestoreInstanceState() methods, any data from previous activities may be lost, resulting in null variables.
First, find the PID of the process you want to kill:
adb shell ps -A -o pid,name

Then, use the
killcommand with the PID:adb shell kill <PID>
If you get the error message "Operation not permitted" while trying to kill a process using
adb shell kill <PID>, it usually means you don't have the necessary permissions to terminate the process.To resolve this, you would need root access on your device, which involves rooting your device. However, rooting can void warranties and pose security risks, so it should be done with caution. If you have root access, you can try using
adb rootto restart the ADB daemon with root permissions and then attempt to kill the process again.
To mimic the OS behavior when reclaiming resources:
adb shell "ps | grep <PACKAGE_NAME> | awk '{print $2}'" | xargs adb shell "run-as <PACKAGE_NAME> kill"Note: The second command uses
xargs, which may not be available on Windows. You can install Git for Windows and run the command in the Git Bash terminal, which includes over 200 Linux commands.
Relaunching the Application
When you relaunch the application, a new process is created with a different Process ID (PID), even though the application ID remains the same. This behaviour demonstrates that killing a process and restarting the application results in a fresh process. This ensures that there is no residual memory from the previous execution, providing a clean state for the application.
After relaunching the application:

Additional Tips
- To filter the output for a specific package name (e.g.,
com.example.app), you can use:
adb shell ps | grep com.example.app
- Some processes may run as system or root users, so their UIDs may differ.
If it's showing grep not found, you can use the below command:
adb shell pgrep com.dilip.qrventory
The Android Application Class
In Android, the Application class is a specific class within the Android framework that is instantiated when the process is created. There is only one instance of this class per process, and it remains alive as long as the process is active. You can access this instance in your code using methods like getApplication() or getApplicationContext().
To customize the Application class, you can create a subclass and specify it in the AndroidManifest.xml file. This allows you to implement shared logic and state management across your application.
Lifecycle of the Application Class
The lifecycle of the Application class is simple yet impactful. It ensures that there is only one instance of the Application object throughout the application's lifetime. This singleton nature allows developers to manage global application state and resources efficiently.
Accessing the Application Object
To access the Application object in your code, you can use methods like getApplication() or getApplicationContext(). This allows you to verify that the Application object is created before any activity in your application. For instance, you can grab a reference to the Application object inside the onCreate() method of an activity and inspect its unique identifier to confirm its existence.
Customizing the Application Class
Android allows developers to create a custom subclass of the Application class. By specifying this subclass in the AndroidManifest.xml file, you can replace the default implementation with your own. This customization enables you to implement shared logic and state management across your application.
Implementing Global Objects
Global objects are shared across all components of an Android application. By storing references to these objects in the custom Application class, you ensure they persist throughout the application's lifecycle. This approach is particularly useful for implementing features like detecting when an application goes to the background or comes to the foreground.
Using the onCreate() Method
The onCreate() method of the Application class is called once when the application is launched. It is the ideal place to perform global initializations, such as setting up logging libraries or lifecycle observers. For example, you can initialize the Timber logging library or set up a lifecycle observer to detect when the application transitions between foreground and background states.
Android Component Lifecycles
A well-structured app relies on a clear understanding of component lifecycles. Let's break down the key components and their lifecycle methods:
Activities:
These are the single screens that make up your app's UI.
Lifecycle methods (
onCreate(),onStart(),onResume(),onPause(),onStop(),onDestroy()) manage how an activity behaves at different stages:Creation
Visibility changes
Pausing due to another activity coming to the foreground
Destruction
Services:
Designed for long-running operations or tasks that run in the background.
Lifecycle methods (
onCreate(),onStartCommand(),onDestroy()) govern their behavior.Different service types (bound, background, and foreground) address particular use cases.
BroadcastReceivers:
These components respond to system-wide events or broadcasts.
Simple lifecycle (
onReceive()) executes only when a relevant broadcast is received.
Efficient App Management
Now that we understand the core concepts, let's explore strategies to optimize processes and create efficient apps:
Choose the Right Component for the Job:
Use lightweight components like BroadcastReceivers for short tasks.
Use Services with appropriate start modes (foreground for critical tasks with user notification) for long-running operations.
Asynchronous Operations:
Long-running tasks that block the UI thread can lead to a sluggish app.
Techniques like AsyncTask or WorkManager allow tasks to run in the background, ensuring the UI remains responsive.
Handling Configuration Changes:
Android can handle configuration changes like (e.g., screen orientation, language settings).
onSaveInstanceState() and onRestoreInstanceState() methods allow activities to save and restore their state during such changes.
ViewModel simplifies UI data management across configuration changes.
Background Execution with Control:
Carefully manage background tasks.
Using alternatives like JobScheduler or WorkManager for background operations.
These offer more control and flexibility over execution timing compared to traditional Services.
Profiling Tools:
Android Studio's Profiler helps monitor app performance and identify potential memory leaks.
Pinpoint resource bottlenecks to optimize your app's process usage and ensure a smooth user experience.
The Out-of-Memory Killer (OOM Killer)
To manage limited system resources, the Android system can terminate running applications.
Each application is started in a new process with a unique ID under a unique user.
The system follows a priority system to determine which processes to terminate:
If the Android system needs to terminate processes, it follows the following priority system:
| Process Status | Description | Priority |
| Foreground | An application in which the user is interacting with an activity, or which has a service bound to such an activity. Also, if a service is executing one of its lifecycle methods or a broadcast receiver runs its onReceive() method. | 1 |
| Visible | User is not interacting with the activity, but the activity is still (partially) visible, or the application has a service used by an inactive but visible activity. | 2 |
| Service | Application with a running service that does not qualify for 1 or 2. | 3 |
| Background | Application with only stopped activities and without a service or executing receiver. Android keeps them in a least recently used (LRU) list and terminates the one that was least used when necessary. | 4 |
| Empty | Application without any active components. | 5 |
The system maintains a least recently used (LRU) list of processes.
The out-of-memory killer (OOM killer) terminates processes from the beginning of the LRU list.
If an app is restarted by the user, it moves to the end of the queue.
Conclusion
Android applications run in their own Linux processes, with the system controlling their lifetime based on factors like active components, user importance, and memory availability. Sandboxing ensures app isolation and security. Activities, services, and broadcast receivers are the key components with their own lifecycles that need to be managed effectively. To optimize processes and create efficient apps, developers should choose the right component for the job, leverage asynchronous operations, handle configuration changes gracefully, manage background execution with control, and utilize profiling tools to identify potential issues. Finally, we discussed the Out-of-Memory (OOM) Killer, the system's mechanism for terminating processes when resources are limited, and the priority hierarchy it follows when making these decisions. By effectively managing processes and components, developers can create Android applications that are both user-friendly and resource-conscious. This article provides a solid foundation for understanding the intricacies of the Android system, allowing developers to optimize their apps for performance and efficiency.